Manage Items
Items are the individual items on a bill. Here you'll learn how to assign them, split them, and keep track.
Item Status
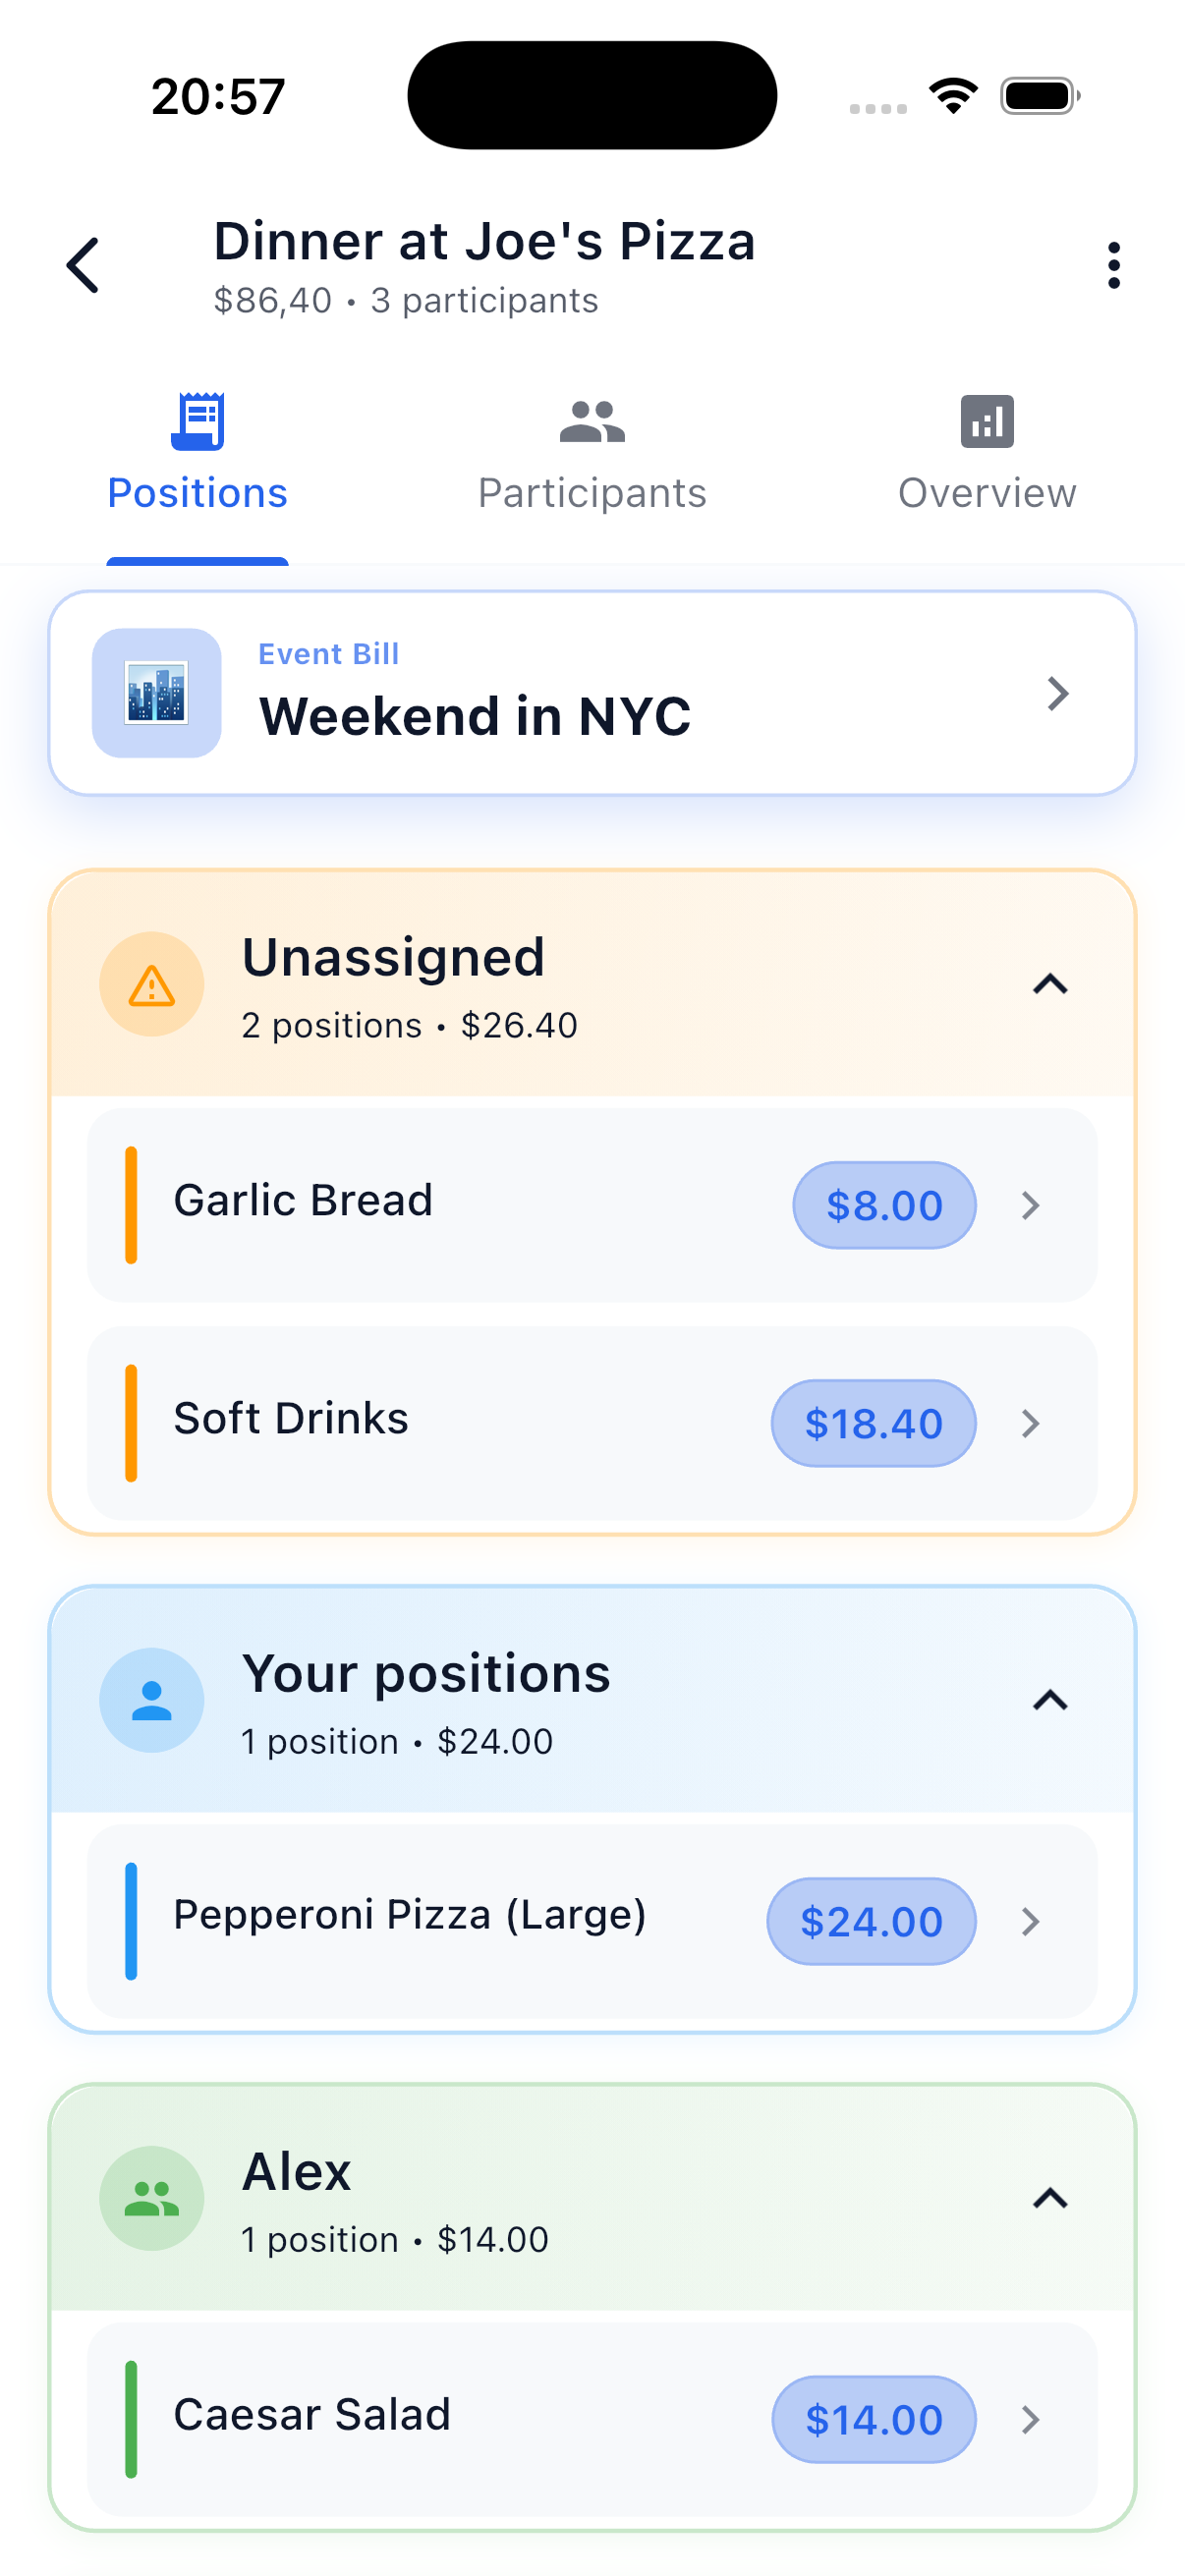
Each item has a status that shows you where it stands. In the app, you can identify the status by the section in which the item appears:
Open — "Unassigned"
The item has not been assigned to anyone yet. It appears in the orange section "Unassigned" with a warning icon. It's waiting for someone to claim it or for it to be assigned.
Assigned
A participant has claimed the item. The amount is included in the debt calculation but hasn't been paid yet. Assigned items are marked with a colored side stripe without an additional icon.
- Your assigned items appear in the blue section "Your Items"
- Items of other participants appear in their green section
Paid
The item has been settled. The amount is balanced and the item is complete. Paid items are recognizable by a green checkmark icon on the item card.
Settled
This status only applies to split items — items that have been divided among multiple people. After a settlement (friends or event), the respective split share is marked as "Settled" and is locked. Individual, non-split items change directly to "Paid" during a settlement.
Mixed State: Partially Settled
A bill can have both settled and unsettled items at the same time. Settled items are individually locked (not editable, not deletable, not releasable). All other items on the same bill remain editable — as long as the bill overall isn't marked as completed or archived.
Permissions
Not every participant can perform all actions. Permissions depend on your role on the bill:
Roles
| Role | Who Is This? |
|---|---|
| Payer | The person who paid the bill |
| Creator | The person who created the bill in the app (often the same as the payer) |
| Organizer | The organizer of an event — applies only to event bills |
| Participant | All other people on the bill |
Who Can Do What?
| Action | Participant | Payer / Creator / Organizer |
|---|---|---|
| Self-assign an item | ||
| Release own item | ||
| Split an item | ||
| Dissolve own split | ||
| Assign item to others | ||
| Release someone else's item | ||
| Edit bill (title, amounts, items) | ||
| Delete bill | Creator or Payer |
In Short
As a regular participant you can do everything that concerns yourself. For actions that affect others, you need the Payer, Creator, or Organizer role.
Actions
Claim — "That Was Mine!"
When you ordered or consumed something, you can simply assign the item to yourself:
- Tap on the item
- Select "Me" in the action bar
- The item is assigned to you and changes to "Assigned"
Quick Assign via Swipe
Swipe an open item to the right to instantly assign it to yourself — no extra menu needed.
Assign
You can also assign one or more items to another participant:
- Select the desired items
- Tap "Others" in the action bar
- Choose the participant the items belong to
Split — Divide an Item
If something was ordered together (e.g., a large pizza or a bottle of wine), you can split the item among multiple people:
- Tap on the item
- Select "Split"
- Choose the participants who share the item
The amount is automatically divided evenly among all selected people.
Example
A pizza for 16 EUR, split among 4 people = 4 EUR per person.
You can set a custom amount for each person. Ideal when not everyone consumed equally.
Example
A bottle of wine for 30 EUR: Person A had 2 glasses (20 EUR), Person B had 1 glass (10 EUR).
How Splits Are Displayed:
Split items appear for every affected person in the item list. This way each participant immediately sees their own share.
A pizza for 16 EUR, split between Daniel and Sarah, appears as 8 EUR for Daniel and 8 EUR for Sarah.
Batch Operations
For multiple items at once:
- Tap the desired items one after another to select them (1 to any number)
- Via the action bar at the bottom:
- Assign all selected items to yourself
- Assign all selected items to another person
- Split all selected items among multiple people
- Release all selected items
Time Saver
Batch operations are especially handy for long receipts with many items — e.g., after a big grocery run.
Release
An already assigned item can also be released again:
Your own items:
- Swipe left → "Release Item"
- Tap on the item → choose "Release" in the menu
- Batch: Select multiple of your own items → "Release" in the action bar
Other people's items (as Payer, Creator, or Organizer):
- Tap on the item → choose "Release" in the menu
- Batch: Select multiple items → "Release" in the action bar
- Swipe left is not available for other people's items
The item changes back to "Open" and can be reassigned.
For paid items, you can swipe left to choose "Mark as Unpaid".
Note
Settled items can also be reset via swipe left — choose between "Mark as Unpaid" or "Release". More on this under Undo Settlement.
Quick settlement — directly with one person
When you want to settle with a single person inside one bill, you don't have to switch to the Friends tab first. Directly in the Items tab, a green banknote icon appears at the top of every person's section whenever there's an open balance between you.
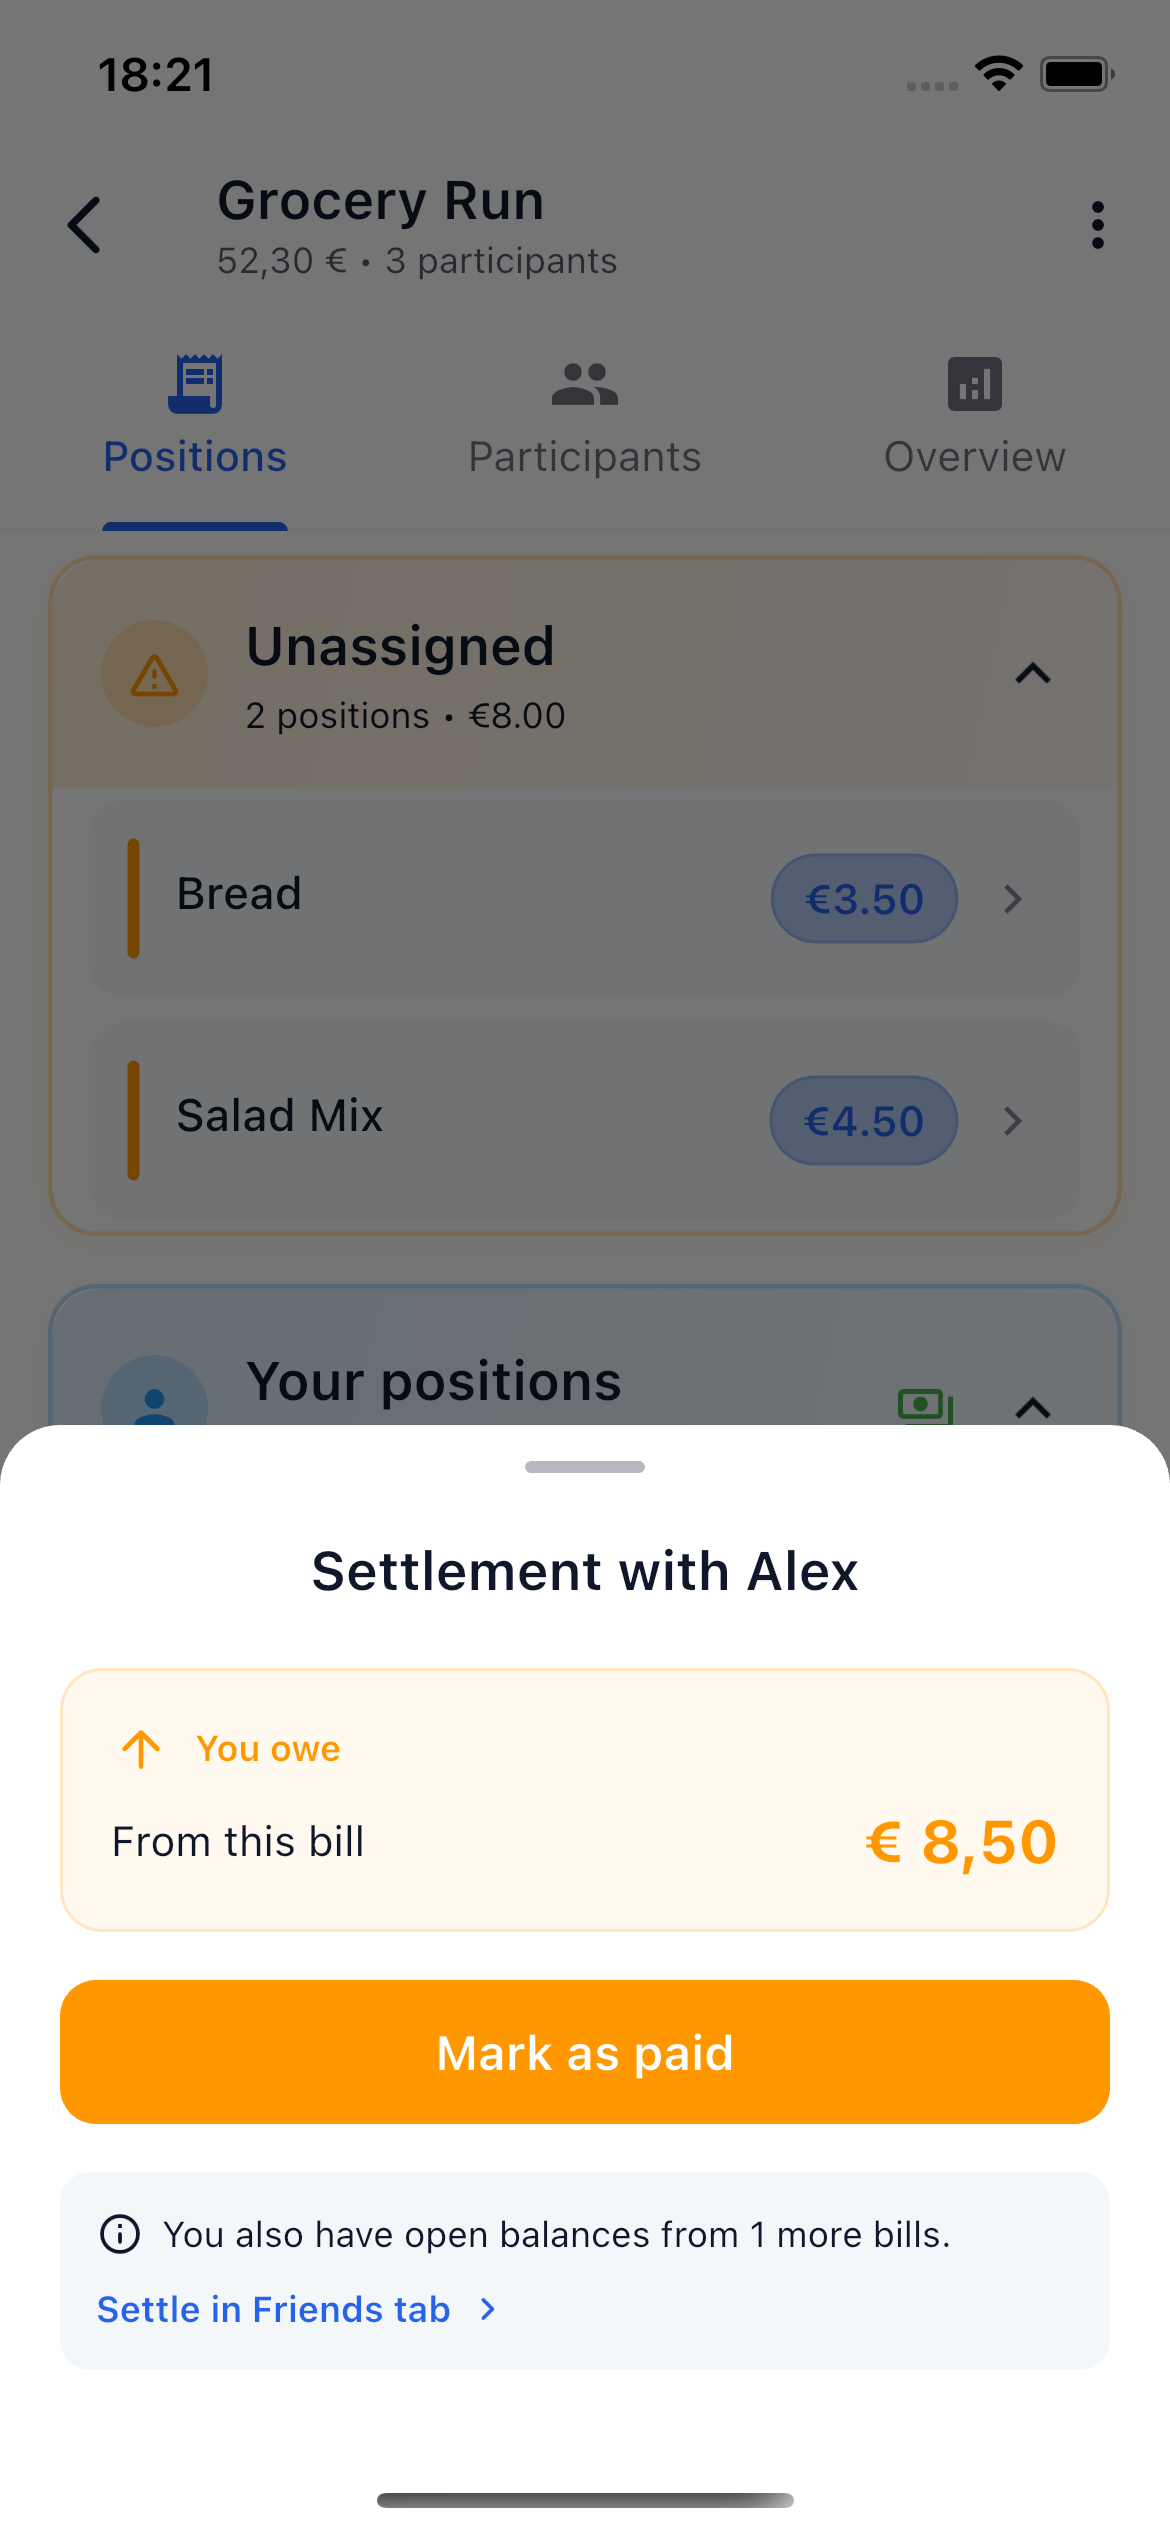
How it works:
- Tap the banknote icon at the top of that person's section
- A dialog opens with the person's name in the header and shows you:
- whether you owe them or they owe you
- the open amount from this bill
- a button "Mark as paid"
- Tapping that button marks all open items in this bill between the two of you as paid
Friends and guests
Quick settlement works both with registered friends and with guests. For guests, the guest detail page opens right after, so you can settle any additional open bills for that guest in one flow.
Several bills at once
If the two of you have open balances across several bills, the dialog points that out and offers a link "Settle in Friends tab". There you can settle everything across bills in a single step.
Keeping Track
Progress Bar
The progress bar in the bill detail view shows what percentage of the bill has been assigned. Only when all items are assigned can the bill be fully settled.
Color Coding
Items are grouped into colored sections. Each section has a colored border and side stripe on the item cards:
| Section | Color | Meaning | Action Needed? |
|---|---|---|---|
| Unassigned | Orange | Open items | Yes — assign them |
| Your Items | Blue | Items assigned to you | No — waiting for settlement |
| Other Participants | Green | Items assigned to others | No — waiting for settlement |
Next Steps
-
Receipt Scanning
Let AI automatically recognize items from photos.
-
Settle Debts
Settle open amounts with your friends.